One of the most controversial topics relative to knives is making and keeping them sharp. Over the years I have amassed a number of sharpening devices, some effective, some not so effective. Among these are Lansky (a device clamps onto the blade spine and guide rods set the correct sharpening angle). This is an excellent device that I would highly recommend to anyone. Crock Sticks (two ceramic rods crossed) all you do is hold the knife steady and slide down the rods. Very simple, yet effective. Diamond hones (generally a single rod impregnated with diamond) used a sharpening steel by setting the angle and sliding the edge down the rod. Belt grinder (generally only used by competent knifemakers to edge a finished knife; not practical for home use), Electric wheel type sharpeners, Chefs choice, etc. (power sharpening with a guide setting angles and edge runs through the moving wheel or wheels) quite effective but can really scratch a fine custom knife. I currently use a three stone oil immersed setup made by Oregon abrasives. There is a rough stone for heavy stock removal, a medium stone to establish the first cutting edge and a finer stone for final edging. The stones rotate and there is an oil bath in the bottom of the device. I used to use the same type set up made by Norton (Multistone) I prefer the Oregon set-up as it is easier, lighter and I can interchange with my Norton stones when I wish. Of course, this barely puts a dent in the number of types of sharpening tools available. The main reason I use sharpening stones is that I prefer to put an edge on a knife that my customers can replicate at home with a minimum of effort (or in the field).
Grinds and Edge Finishes
Although this is an article on sharpening devices, it would not be complete without a basic understanding of the different types of grinds and edge finishes: One of the most basic and common grinds is the hollow grind. This grind is accomplished on the round wheel of a belt grinder. Once the initial hollow is established it is quite easy to hold and deepen with continuous passes across the wheel. Hollow grinds can produce a very sharp cutting edge and the typical hollow ground blade is brought to a mirror finish with the aid of a buffer. In my opinion, the downside to the hollow grind is that there is no metal support behind the cutting edge. Usually, it is a bit easier to sharpen but I prefer a hollow ground blade only for fine skinning or caping work. When put to hard use such as chopping or splitting the cutting edge can be a bit thin. Another common grind is the Convex or Moran edge. Some other names for this grind are the Cannell or appleseed edge. In reality, the Moran Edge is simply an edge usually formed on the slackbelt portion of a belt grinder. There is a constant curve starting at the spine and ending at the cutting edge. This type of grind by nature is an effective chopper. There is little resistance when chopping or splitting wood with the Moran Edge. Many people have a difficult time re-sharpening this type of edge and for a very find, skinning type knife some prefer a hollow or flat ground blade.
Flat Grinding
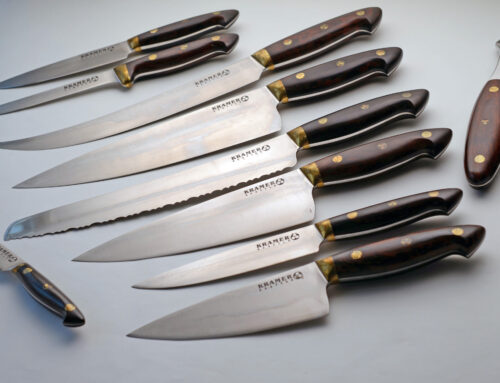
Flat Grinding is another of the methods used. This grind is usually produced on the flat platen attachment to a belt grinder. The grind is just like it sounds, there is a constant angle from the spine of the blade ending at the cutting edge. A flat ground blade is ideal for a satin finish (also known as a handrubbed finish). The edge can be made quite sharp and it is supported by metal behind the cutting edge. Some feel the flat grind is too time-consuming and difficult to produce. I find that it makes for a sharp, durable edge that can be replicated with ease. There are many other types of grinds such as Sabre, chisel, etc. The list goes on and on. The grinds that I typically utilize on my knives are the flat grind and the flat grind with a convex edge.
After my knives are flat ground, heat-treated, handfinished, etched (if Damascus) I go to my slackbelt on my variable speed Burrking grinder and while keeping the cutting edge down and the spine almost flat to the belt, draw the blade from side to side. This removes unwanted metal from behind the cutting edge making for a much better cutter and also if done properly puts a slight convex edge on the blade. I then sharpen the edge on my stones and test cut (generally through 2×4’s, rope, cardboard boxes, etc.) The edge is flexed for durability testing over a brass rod and if all goes well the edge is removed so that the blade can be finish sanded, the guard mounted and the handle applied.
Final Edging
Once the knife is finished it is ready for the final edging. I use a worn 220 grind belt on the slacked portion and take a couple of passes on the cutting edge. I then go to a medium grind stone and at approximately a 22° + angle push the cutting edge into and across the stone. I alternate sides with each stroke then go on to the fine India stone and replicate this procedure. When almost finished I lift the spine of the blade and lightly finish my strokes. All that is left to do is remove the wire edge created by the stones, belt, etc. This can be done in a manner of ways. I usually prefer an aggressive cutting edge that I like to call “meat cutting”. There are those that prefer a polished or buffed on edge. The polished edge is great for that hairpopping edge that looks so impressive but in actual hard use does not stand up. Also, it does not slice rope very well as it tends to slide a bit. After my wire edge is produced I use simple, somewhat fine kitchen steel. There is a misconception that there are sharpening steels that remove metal where in actuality they realign the cutting edge. I use the steel similar to the way I sharpen, I run the cutting edge down the steel on each side until the wire is removed. This leaves a very aggressive “meatcutting” edge that is easily kept up at home or in the field with a few swipes of the steel. You can always use a strop if you prefer that type of edge. This is used by dragging (as opposed to pushing) the edge across the strop on each side until the burr is removed.
For more information on custom knife sharpening or just general information on custom knife options, be sure to contact us for all of your needs.
February 20, 2017